
Setting up a python environment helps you to keep your projects and your installed packages organized. For this, the Anaconda Project can be very helpful, since its environment-control features work pretty well in my use cases.
Let me show you how you can use its features to waste less time with package dependency issues and do more deep learning!
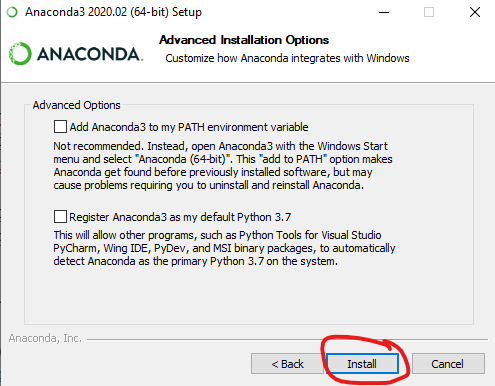
How to install Anaconda in Windows 10
To install Anaconda on Windows 10, you can download it here: https://www.anaconda.com/products/individual
Do NOT install Anaconda on your PATH. We will do it in a different way. Just click install here:
How to set up with Git Bash
We don’t want to have different types of terminals on our machine. We want to be able to use anaconda and all its features within git bash. To accomplish this, we simply create (if not existent) a .bashrc file in c:/Users/[USERNAME]/ and activate our anaconda base environment from there. So we add this line of code (update your username there) to the file:
|
1 |
source C:/Users/[USERNAME]/anaconda3/Scripts/activate |
After adding the line, we simply go into any folder, click right and open a new git bash terminal. Now we see a small (base) above our input line. This means, our code works and we can now use anaconda inside git bash.
How to create a new environment
As a use case, we want to experiment with brand new Tensorflow features, which are only accessible from the nightly version. But we do not want to interfere with any other Tensorflow version we have installed. So we create a new tf_nightly_env environment. For this, we type in our shell:
|
1 |
conda create -n tf_nightly_env python=3.7 |
We simply create a new conda environment and name it tf_nightly_env with -n parameter.
You might ask yourself why we specify the version of python here. That’s because if we don’t, then the python in our base environment will be used and all packages we install there via pip are also installed in this environment. So we cannot use the advantages of anacondas environments. That’s why we specify the python version, so Anaconda installs a NEW python into the directory of our environment. So we can encapsulate our tf_nightly_env environment from our base environment.
Now we just have to activate it and install our needed tf_nightly package via pip.
|
1 2 3 |
conda activate tf_nightly_env pip install tf_nightly_gpu |
Now Tensorflow is installed and you can start developing!
Be aware that the packages you install in this environment are only accessible from this environment. However, installing packages into the base environment makes those packages the default for new environments. It is best practise to keep the base environment clean and only install packages in your new environment.
That’s is! Did it work for you? Do you have anything to add? Please write it in the comments!